| Sv translation | ||||||||||||||
|---|---|---|---|---|---|---|---|---|---|---|---|---|---|---|
| ||||||||||||||
一、Windows 固件烧录说明
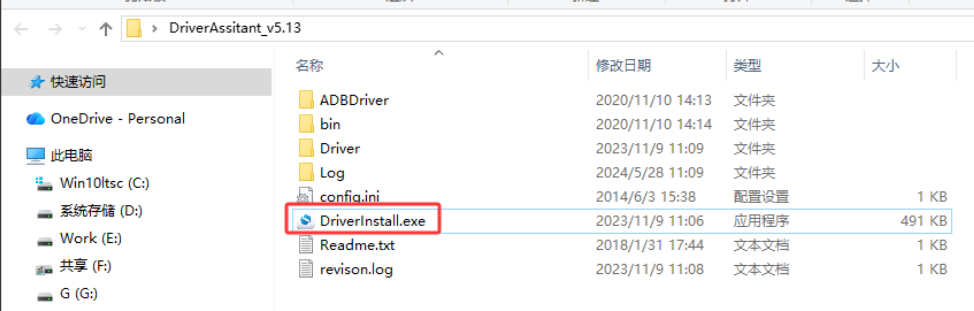
1. 安装USB驱动。
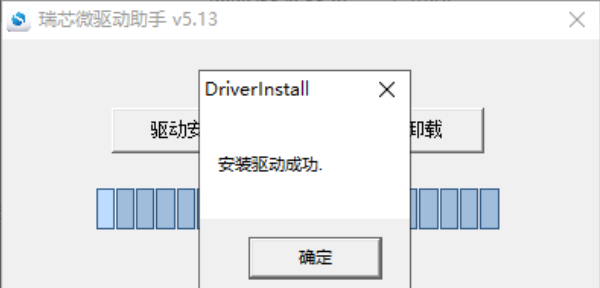
1.2.点击“驱动安装”
1.3.安装成功会提示安装成功,并点“确认”退出安装,并关闭驱动安装窗口。
2. 固件烧录
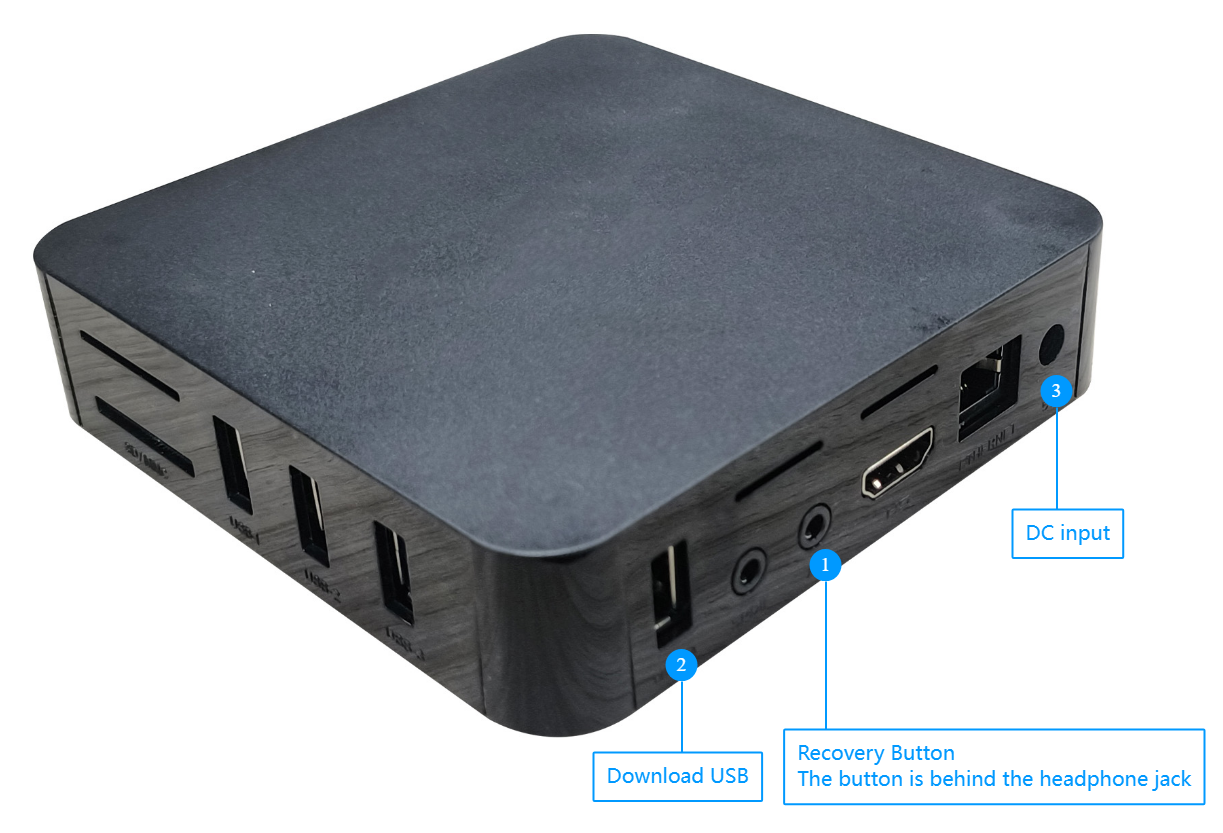
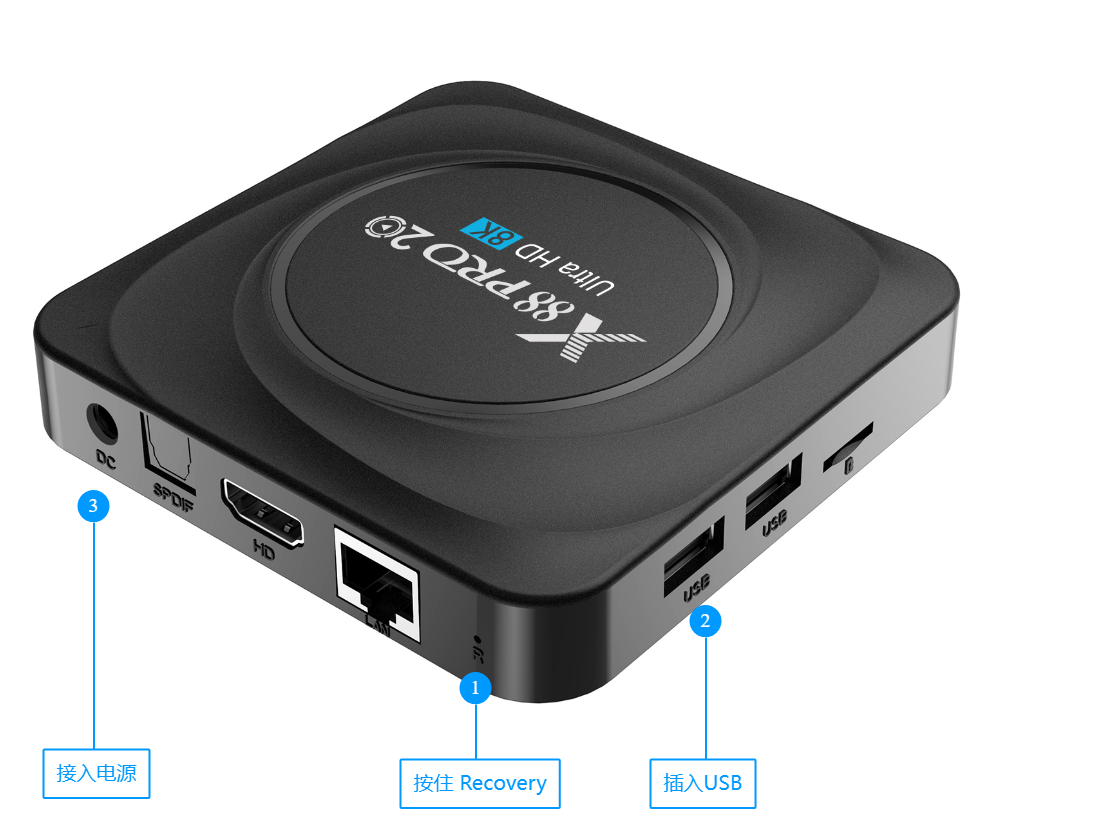
2.2.用USB A to A 公头USB线,将电脑和RK3328 USB2.0 烧录口,按住recovery键不放(在AV口后面)后再接通5V 电源
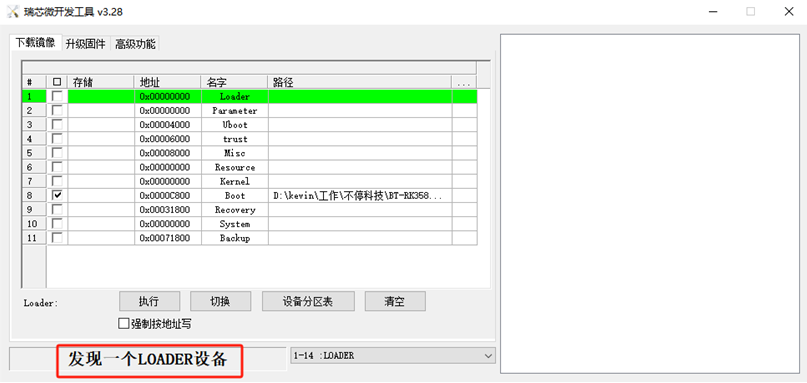
2.3.烧录工具会自动识别到设备,出现“发现一个LOADER设备”后松开 recovery按键。
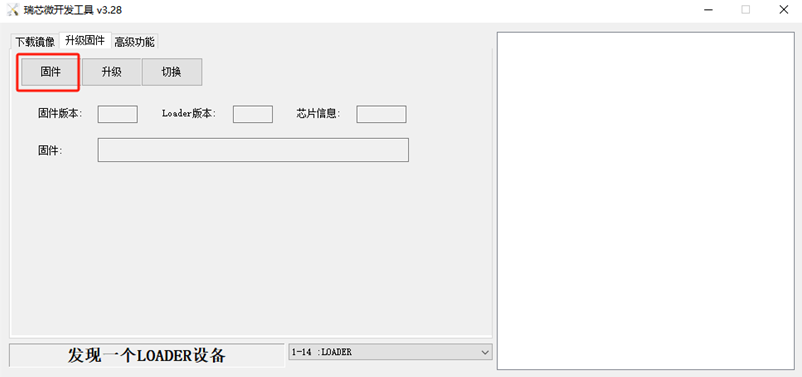
2.4. 点击升级固件,选择固件。
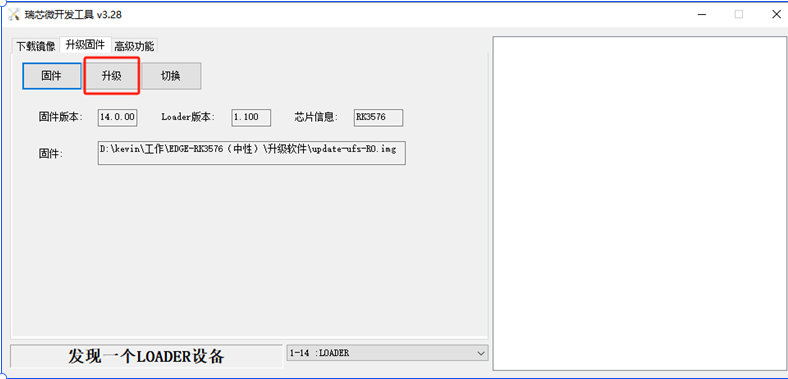
2.5. 选择完需要下载的固件之后,点击升级。右侧界面显示升级进度,升级开始。
2.6. 右侧显示进度100%,烧录工具设别到ADB设备,设备烧录完成。
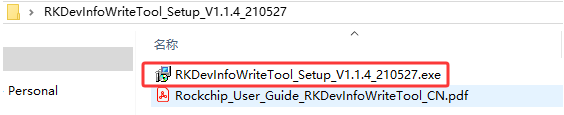
3. MAC 码烧录说明MAC 码烧录工具链接:
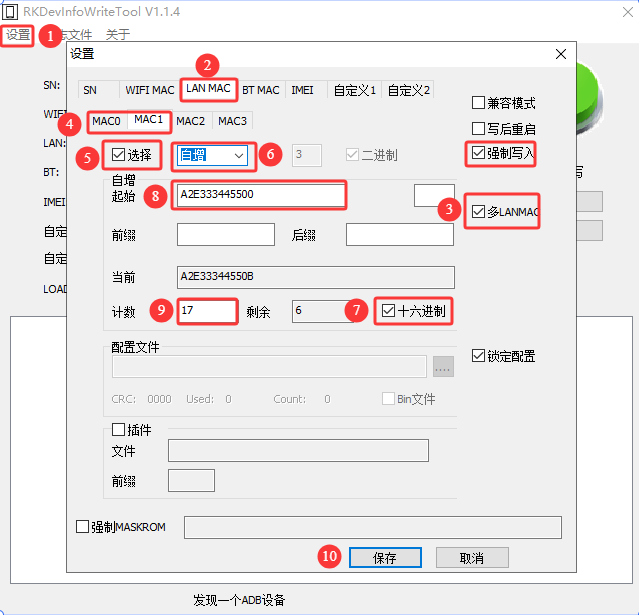
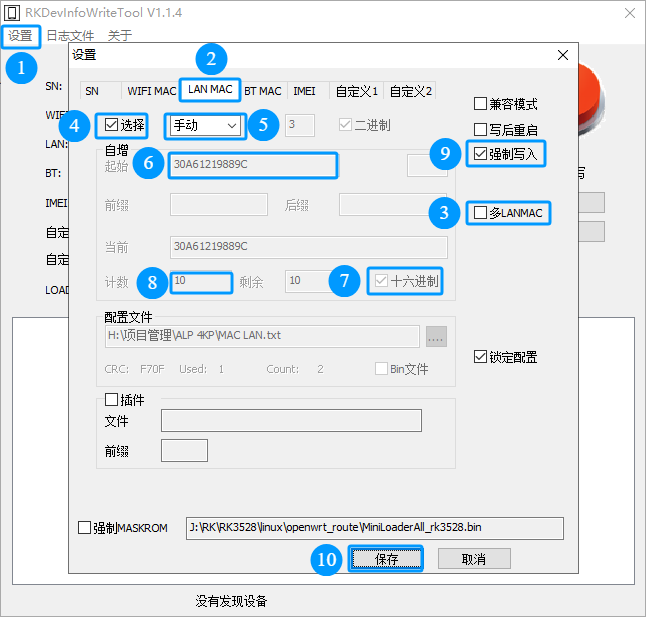
3.2.打开RKDevInfoWriteTool--设置--LAN MAC--不要选择 多LANMAC--勾选选择 --选择自增/手动---勾选 十六进制---填入MAC 码--填入烧录的数量–保存
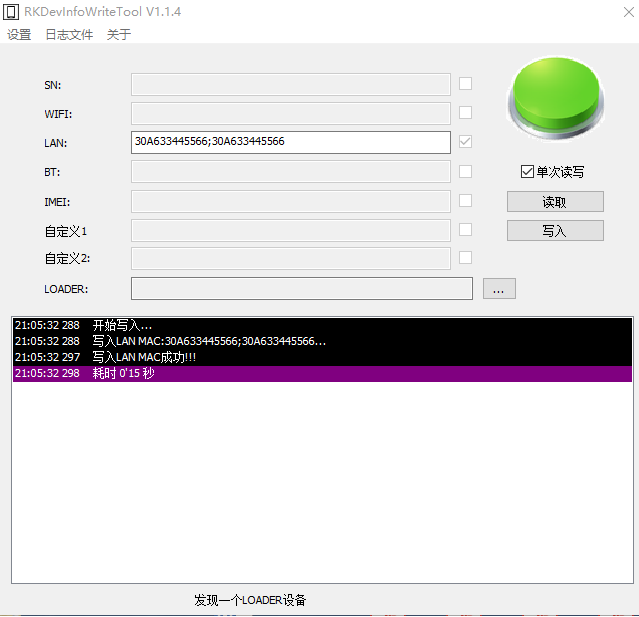
3.3.如果是手动输入MAC码,在烧录界面输入MAC,为6对16进制数字。
3.4.USB A to A 公头USB线,将电脑和RK3328 USB2.0 烧录口,按住recovery键不放(在AV口后面)后再接通5V 电源,出现“发现一个LOADER设备”后松开 recovery按键,点写入即可。进入Loader可参照1.2.2章节。 二、Linux环境固件烧录1.工具准备
⼯具说明⽂档: <SDK>/tools/linux/ToolsRelease.txt 驱动安装⼯具 Rockchip USB 驱动安装助⼿存放在 <SDK>/tools/windows/DriverAssitant_v5.13.zip SDK 提供 Linux 烧写⼯具(Linux_Upgrade_Tool ⼯具版本需要 V2.26或以上),⼯具位于⼯程根⽬录: <SDK>/tools/linux/Linux_Upgrade_Tool/Linux_Upgrade_Tool Linux 环境下打包update.img固件⽅法,运⾏如下命令⽣成update.img <SDK>/tools/linux/Linux_Pack_Firmware/rockdev/mkupdate.sh Linux环境下的烧录工具在SDK的路径: Linux SDK:tools/linux/Linux_Upgrade_Tool/ Android SDK:RKTools/linux/Linux_Upgrade_Tool/ 常用烧录指令
|




| Sv translation | ||||||||||||||
|---|---|---|---|---|---|---|---|---|---|---|---|---|---|---|
| ||||||||||||||
一、Windows 固件烧录说明
一、Programming Manual For WindowsProgramming Tool、Driver Download Link:https://pan.baidu.com/s/1ugVAJ35VeWkUoKOjiLgvXQ?pwd=3iyb 提取码: 3iyb Install the USB driver1.If a driver has been installed previously, please update the USB driver (DriverAssitant) to version 安装USB驱动。
.1.1版本及以上 . 1.1 Extract the downloaded compressed package to an English-only path, then double-click DriverInstall.exe to install the driver. 1.将下载的压缩包解压到英文路径下,并双击DriverInstall.exe 进行驱动安装。
1.2 Click Install Driver.点击“驱动安装”
1.3.Upon successful installation, a prompt will indicate Installation succeeded.
2.Firmware BurningPlease use 固件烧录
_Release_v2.90 or later.版本及以上版本 .下载烧录工具,解压后打开文件夹,双击“RKDevTool.exe”
2.2. Connect the PC to the USB2.0 burning port of RK3566 with a USB A-to-A cable. Press and hold the Recovery key (the small hole near the Ethernet port), then apply 5V power supply.用USB A to A 公头USB线,将电脑和RK3328 USB2.0 烧录口,按住recovery键不放(在AV口后面)后再接通5V 电源
 2.3.The flashing tool will automatically detect the device.
2.4. Click Upgrade Firmware and select the firmware file.。点击升级固件,选择固件。
2.5. After selecting the required firmware, click Upgrade.
2.6. When the progress on the right reaches 100% and the flashing tool detects an ADB device, the firmware burning is completed.右侧显示进度100%,烧录工具设别到ADB设备,设备烧录完成。
3. MACAddress Burning Tool Link码烧录说明MAC Address Burning Tool:码烧录工具链接:
3.2. Open RKDevInfoWriteTool → Settings → LAN MAC
3.3.If entering the MAC address manually, input two MAC addresses in the burning interface, separated by a semicolon ";".
3.4.Connect the Type-C burning interface, press and hold the Recovery key (the small hole near the Ethernet port), then power on with 12V. 二、Programming Manual For Linux打开RKDevInfoWriteTool--设置--LAN MAC--不要选择 多LANMAC--勾选选择 --选择自增/手动---勾选 十六进制---填入MAC 码--填入烧录的数量–保存
3.3.如果是手动输入MAC码,在烧录界面输入MAC,为6对16进制数字。
3.4.USB A to A 公头USB线,将电脑和RK3328 USB2.0 烧录口,按住recovery键不放(在AV口后面)后再接通5V 电源,出现“发现一个LOADER设备”后松开 recovery按键,点写入即可。进入Loader可参照1.2.2章节。 二、Linux环境固件烧录1.工具准备1.Tool Preparation
Tool Documentation 驱动安装⼯具 The Rockchip USB Driver Assistant is located at: SDK provides a 提供 Linux flashing tool 烧写⼯具(Linux_Upgrade_Tool ⼯具版本需要 V2.26 or later26或以上),⼯具位于⼯程根⽬录: ). Method for packaging update.img firmware on LinuxLinux 环境下打包update.img固件⽅法,运⾏如下命令⽣成update.img Run the following command to generate update.img: Path of the Linux Flashing Tool in the SDKLinux环境下的烧录工具在SDK的路径: Linux SDK:tools Linux SDK: tools/linux/Linux_Upgrade_Tool/ Android SDK: RKToolsSDK:RKTools/linux/Linux_Upgrade_Tool/ Common Flashing Commands常用烧录指令
|